
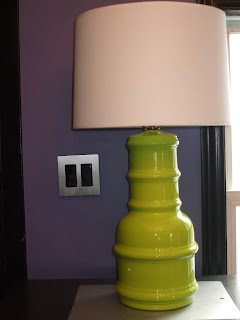
 A while ago, I nabbed this lamp at the 50 mile Musquodoboit Valley yard sale (see 50 miles of possibilities, September 11, 2010). I’m pretty sure I paid $5 for it. I loved the size and the shape….it just needed a new lampshade.
  I wasn’t crazy about the stripes painted on it and would have preferred an all white lamp base. But there were options….
So this weekend, I decided to finally change it up and give it another whole new life. With just a few easy steps, it now looks fresh and modern.
What you need:
1 can of Tremclad spray paint (your choice of color) -- $10
1 new lamp shade -- $12.95
Small piece of sandpaper
Painters tape or masking tape
 Here are the steps:
1. Use painters tape to cover the metal bracket for the shade, the light socket and the electrical cord. Tip: use paper lunch bags (or any other small bag to slip over the bracket, socket and cord. Tape them closed and you can be sure no paint will reach them.
2. Lightly sand the entire ceramic base to remove some of the existing gloss finish. Wipe clean with damp cloth.
3. Carefully and slowly spray the ceramic base, starting at the top and working your way around and down to the bottom until entire lamp base is covered.
4. Wait to dry and spray on another coat. Repeat until you’ve got a good coat of a nice, even, full paint coverage.
5. Let dry overnight. Remove tape and attach new lamp shade.
Two notes of caution….spray paint is hard to control and if you hit it with too much paint, you will get runs. Be patient and add to paint in layers and you will get a wonderful glossy finish of rich color you are looking for!
And, please use spray paint in a well ventilated area. Preferably outside, but not when it’s windy. This stuff gets EVERYWHERE….I’d recommend using a mask as well, because it’s hard to do any type of spray paint project without breathing some of it in (yikes).
 Tip: WD40 is fantastic at removing paint from just about any surface that you might accidentally get paint on. Prepare for the wide range of overspray, but have some hefty paper towels and a can of WD40 on hand for speedy clean up immediately after you ’ve done spraying.
I’m thrilled with the results of my mini makeover. Total cost of this project was $28…and I just saw a similar ceramic lamp in one of the fancier décor stores. It was a bit smaller, but similar in shape and the exact same color…and it was priced at $240!
I like mine much better.
For more about rouge, visit www.littlered.ca or check out past blogs at www.justalittlerouge/blogspot.com
.JPG)
I just LOVE this lamp! Great job!
ReplyDeleteThanks very much....it was fun and easy!
ReplyDelete