Showing posts with label upcycling. Show all posts

Monday, January 7, 2013

pallet houses


Yep...that is indeed a home made out of used pallets. Did you know that there are about a gazillion (don't quote me on that) pallets used and discarded in North America every day?

Brilliant and simple thinking from i-beamdesign created a sustainable /recycled use for them. Why not build homes in disaster stricken areas? Or for refugees? These plans are available to the public for purchase as well. To check out more about this incredible design, check out their website and videos here:

www.i-beamdesign.com/projects/refugee/refugee.html

As you can imagine this can make a HUGE difference in many parts of the world.

AND, from a strictly creative perspective....you can go anywhere from this basic idea...weather proof homes, cottages, shelters...and yes, even furniture.


Here are a few more pics to prove that one man's trash is another man's treasure. And that sustainable building and living are indeed the best way to go on our planet!

Upcycle, recycle, reduce, reuse...go on, get creative!


Relove!


Monday, November 26, 2012

avant-guarde art


Great idea in the latest Style at Home magazine...had to steal it right away and try it out! It's a perfect way to add a great punch of energy to your space through artwork.

What you'll need:

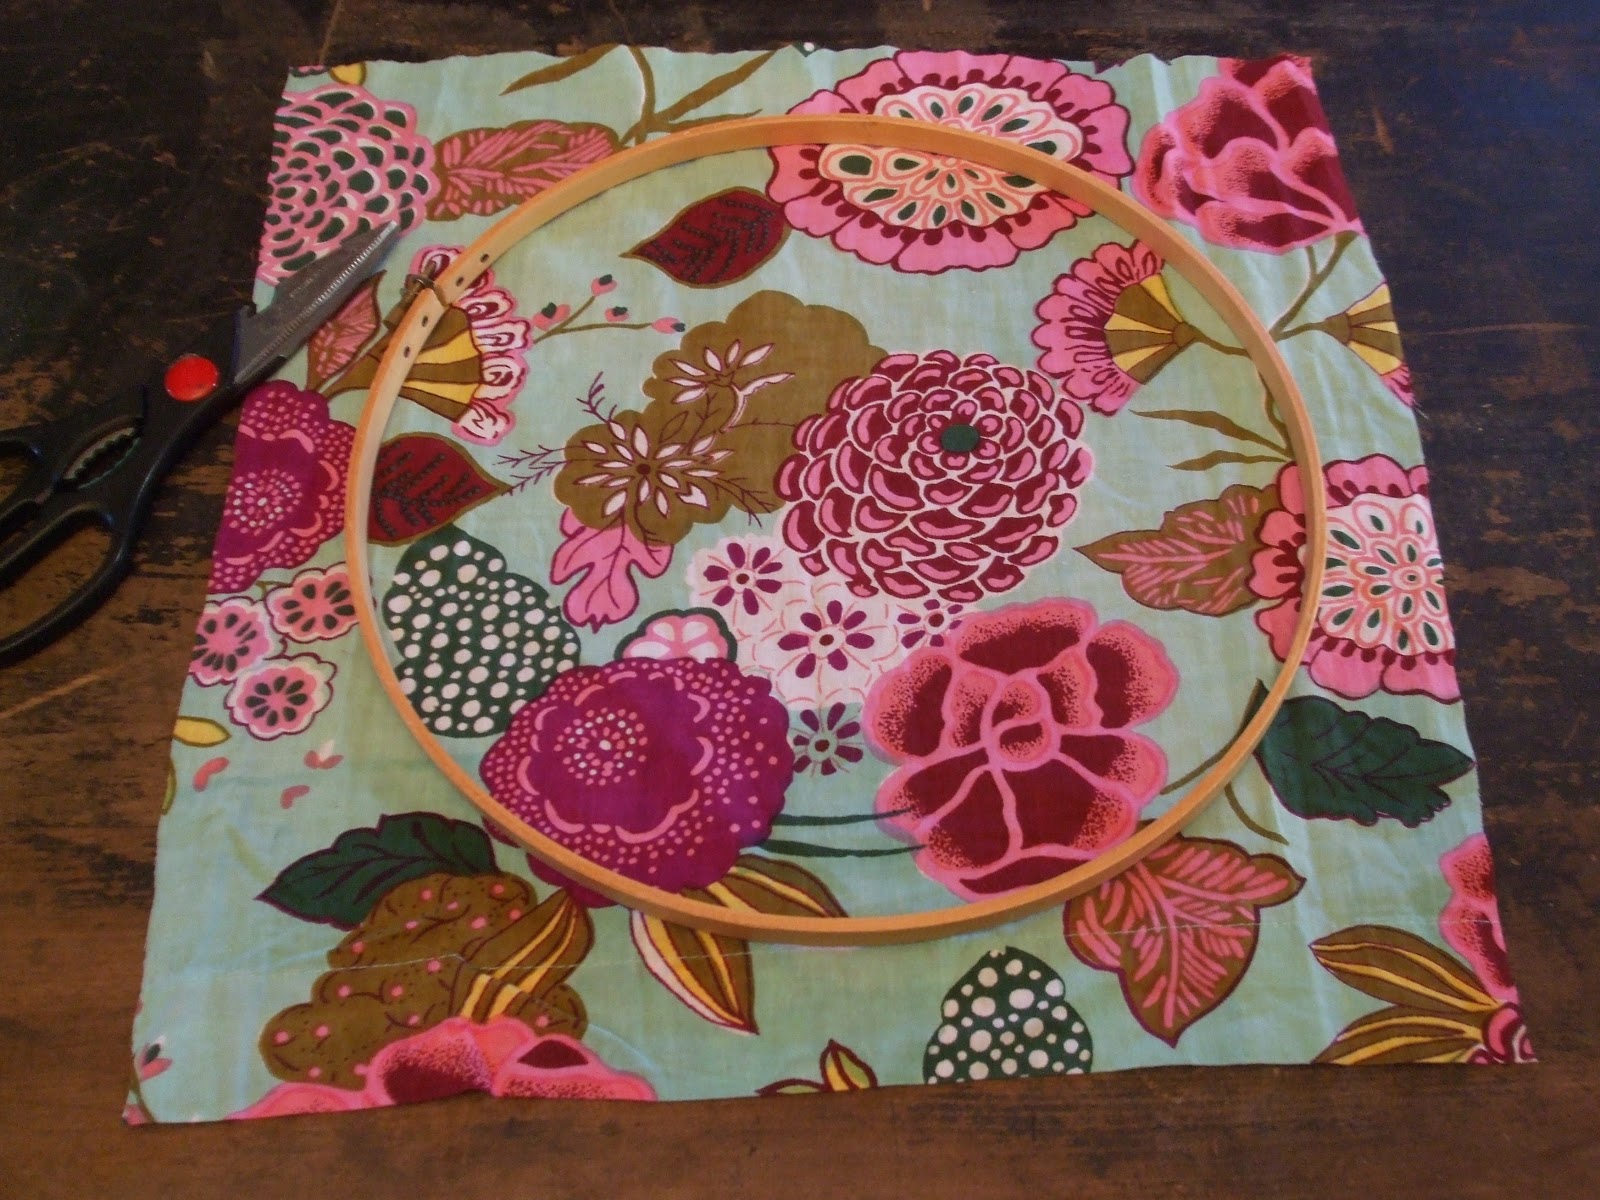
  • fun fabric
  • scissors
  • embroidery rings in multiple sizes

Instructions:
  • separate the embroidery ring into it's two pieces
  • lay out the fabric on a hard, flat surface (easier for cutting!)
  • place the smaller of the two rings on the fabric...move it around so you see what you like inside the ring
  • cut the fabric at least 2 inches wider than your smaller ring
  • set the fabric, face down, on top of the larger ring
  • set the inside ring on top of the larger, outside ring. Centre and push down to tighten and secure the fabric
  • gently pull the fabric until it's nice and tight inside the rings
  • tighten the screw on the side of the embroidery ring to secure
  • trim the excess fabric
  • hang on the wall


What's great about this idea is that you can change out the fabrics as often as you like to change up the look. This took me about 10-15 minutes from start to finish (when I hung them on the wall!). 

And you can't beat the price. I bought my supplies at Value Village...the "vintage-y" looking fabric is actually a set of curtains that I scooped up for $9.99 (and I have TONS left over for other projects), and both embroidery rings for $1.49 & $1.99.


I'm on the lookout for more embroidery rings, so I can expand this art piece all along the wall. I'll mix up the fabrics too, so it will really have some punch!

Enjoy,

xx rouge.


Sunday, June 24, 2012

steal this deal – part 2


Hey, just a little rouge readers!
Sorry for the delay...I was working on a project over Father’s day weekend and I wanted to show you the finished piece!

You may remember one of my recent blog posts (Steal this idea --February 12th) where I posted an idea I saw on design sponge...creating a charging station from a vintage travel case.

My mom generously gave me a travel case for the project. She was given it as part of a set of luggage for graduation in 1963. I remember that when I was younger, I used to store my Barbies and Barbie clothes in this case. Luckily, mom had it tucked away all this time.


My dad helped me out...cutting the hole for the electrical cord, cutting out the right sized pegboard and making small cleats to hold the pegboard in place.


Yesterday, I put the rest together. I spray painted the pegboard a glossy white as well as a piece of cork board. While drying, I repapered the inside of the travel case with an awesome vintage patterned paper I found at Michaels. (It took 4 only individual sheets, $0.49 each)


Next, I pulled apart two grommets from an old curtain. Using pliers, I pulled off the back metal pieces and was left with the nice front parts. Then, I glued one on either side of the hole in the back of the case to create nice, clean, and sturdy place for the power cord.

I added a card, written by mom, to show the original history and the date she received it. I pasted this behind the original mirror and then put the mirror back in place.

I glued a length of ribbon into a loop and glued that to the underside of the pegboard, with the loop off to the side. This allows me to easily lift the pegboard and access the cords and chargers that rest in the bottom of the case.


Finally, I cut the painted cork board down to a small size to fit at one end of the pegboard and glued it down. I added a couple of push pins in coordinating colors and now have a little message board that I’m sure to see as I grab my phone and head out the door.

I’m thrilled to be able to give this train case a new life. I love that it comes with some of my mom’s history and I love that it was a project my dad helped with.


It’s a perfect fit to the existing decor in my mud room...and I’ll never pick up my ipod or phone and realize my battery is dead again!

For complete step by step instructions, please see February’s blog.

See you next week.


Join us at www.facebook.com/rougesuzanne where you’ll find links to weekly blog posts and design ideas, tips, random thoughts and photos.

For more about rouge, visit www.littlered.ca or check out past blogs at www.justalittlerouge/blogspot.com

Sunday, November 6, 2011

upcycled mirror

I found this wonderfully large mirror about two years ago…and it’s been on the “project list” in the basement ever since. When I say found, I really mean that I saw it on the sidewalk one day, out with someone’s trash. I know, I know…it’s not the first time this has happened.

And really, it doesn’t happen that often.


Anyway, I could see the potential. The frame was in great shape, albeit it has seen better days, but still solid wood with a simple style. The mirror was even in tact! The only piece a bit worse for was that the pressboard backing was a bit warped.


In the spirit of upcycling, I took it home. Finally, I found a use for it...the perfect fit for a friend’s cottage. So, the last time I visited the cottage, I packed up my stuff for the visit, and jammed in all the things I would need to do this project at the cottage in the car…

Here are the steps to this makeover project:

1. thorough clean with a damp cloth, wipe dry

2. place on a large drop cloth, in a well ventilated area (outside is best)


3. paint with awesome blue paint left over from another project. (Note: normally, I would recommend priming it first, then painting, but I forgot the can of primer and was too lazy to drive to the nearest town to buy some.)

4. Let dry. Paint second coat of blue paint and let dry.

5. Paint third coat of paint (argh. That’s what happens when you don’t use primer!) and let dry.

6. Flip over frame, place clean mirror into the frame.


7. Add the newly flattened backing into the frame. (I just put this under some heavy stuff for about a week or so to help straighten it out again. It wasn’t perfect, but when it was secured to the frame, you’d never know it.)

8. Secure the backing into the frame with small finishing nails around the entire outside edge.

9. Volia – you are done!

In the spirit of upcycling, I gave this old mirror a new life. I left it for the new owners to hang it on the wall...in case they decided to put it somewhere else.

I like it here because it reflects the light into a dark-ish area of the cottage (and is perfect if you really want to check out your cottage hair!) I think it fits perfectly in the cottage eclectic décor.


This 2 day project was done on a budget that breaks out like this:

 “vintage” mirror (random sidewalk) – $0

 paint – left over from past painting projects - $0

 finishing nails (Home Hardware) - $0.09


Now, that’s hard to beat!


For more about rouge, visit www.littlered.ca or check out past blogs at www.justalittlerouge/blogspot.com

Sunday, October 16, 2011

diy lampshade -- upcycle it!


Sorry about last week, faithful just a little rouge readers… I must have been in a turkey coma and forgot to post a blog!

This week is a little upcycling project that comes courtesy of my very smart and crafty friend, Brie. She had such wonderful results with her project, I decided to try it out for myself!


This is a simple and low cost way to upcycle a paper lamp shade. Paper lamp shades were/are quite popular and low cost. If you are starting to get a bit tired of the look, here’s a way to breathe some new life into it…


What you need:

• Paper lamp shade

• Plain white paper (8 ½ x 11 is fine)

• Paper cutter

• Glue gun & extra glue sticks


Cut a bazillion strips of paper approx 4 inches wide with the paper cutter. Ok…maybe not really a bazillion, but you’ll need a lot.

It’s important to use a paper cutter to make sure all of your strips are the same length and width. (And who would want to do that by hand anyway??) I used plain white paper, so my strips were 8 ½ x 4.

Warm up the glue gun, and run a bead of glue along the outside of the paper shade, following the wire rim. Quickly stick the strips of paper to the shade (I say quickly, because glue from the hot glue gun dries fast!), slightly overlapping the next strip on the last as you go along.

Starting from the bottom, work your way all around the entire shade, making your way up to the top of the shade.

A good tip here is the find a place to hang the shade, so you can easily access all sides of it, turning as you go. I learned early on in this project that it’s hard to hold the shade, glue it, place the strips of paper, and turn it with only two hands!


Finally, I got smart and hung the shade from a piece of string from my overhead pot rack in the kitchen…worked like a charm!


Be patient…it’s going to take you a few hours to do this, but it’s worth it in the end.

Now my old paper shade is hanging in my bedroom and offers a very soft, interesting, mood light. If you didn’t actually touch it, my guess would be that you wouldn’t know it was paper. It looks like a more expensive, trendy light fixture now.

Shortly after my friend shared this gem of a DIY project, I saw something very similar on a home décor show….they started with a huge paper shade and glued cone-shaped coffee filters all the way around instead of paper strips. The finished product looked fabulous!


The entire project easily cost less than $10…so what have you got to lose? Give it a try…


For more about rouge, visit www.littlered.ca or check out past blogs at www.justalittlerouge/blogspot.com

Sunday, July 17, 2011

laundry room / mud room -- take a look!

So…here it is!

After many months of savings, a long and frustrating permit and variance process, 2 ½ months without the ability to do laundry, a gazillion days of rain, 11 inspections and a whole bunch of other things….I’m ready to show you the inside of my new laundry / mud room. Here are a few highlights (some of which I’ll post further blogs about!):

• upcycled – vintage dressing table, vintage tulip chair, old wood door and a Value Village lamp.
• an amazing set of custom-made sliding doors on an industrial track
• new washer/dryer (Samsung, Future Shop)
• customizable shelving unit that gives me lots of storage space (Rubbermaid, Rona)
• a cool black utility sink and a DIY backsplash (Smart tiles, Home Depot)
• black silk curtains hung from the ceiling that beautifully disguise lots of hooks and shoe & purse storage snuggled up behind the door (Bouclair Home / Rona)
• a black and white floor with vintage charm (Kent)
• black walls (Black Iron, Benjamin Moore) and trim (Jet Black, Benjamin Moore)


I am very happy with the end result. It turned out even better than I had been picturing it all this time! I love it when something in your head finally all falls into place.


Believe me when I tell you that I never thought I’d enjoy doing laundry, but today, I do.

And I love coming home, opening the door and seeing this room. I’m not used to it yet…the last bits just got finished yesterday.

Actually, if I’m being truthful, there may be still a couple of little things to finish up but it’s so close to being done, I couldn’t wait another week to show you.

Hope you enjoy...I'm going to take a little rest now!


For more about rouge, visit www.littlered.ca or check out past blogs at www.justalittlerouge/blogspot.com

Tuesday, October 26, 2010

upcycle by rouge -- dresser on sale!

The vintage glam dresser upcycled by rouge (see September 20 blog post) is now on sale! Must go...need space for next project!!

This great, solid wood dresser –that can be used in a bedroom, in a closet, in an entry way, in a bathroom, and even in your kitchen – provides excellent storage. It’s got a hammered aluminum metal finish and vintage glam drawer pulls. It measures 44 inches (height) x 29 inches (wide) x 18 inches (deep).

Orginal Price = $295 Now on sale for $195!


upcycle by rouge” is all about taking something old and giving it a new life. Not just re-using it, or recycling it, but making it better than it ever was before. Mixing old vintage and vintage-inspired pieces with modern elements to create truly one-of-a-kind originals that you simply will not ever see anywhere else.

Get in touch to grab this deal...


For more about rouge, visit www.littlered.ca or check out past blogs at www.justalittlerouge/blogspot.com

Monday, September 20, 2010

upcycle by rouge

Hello just a little rouge readers! Here is some exciting news and another make-over project I wanted to share with you.

I picked up this awesome, solid wood dresser from a client a little while ago. I was drawn to the shape, size and the cool little retro details. I’ve been mulling over what to do with it since I got it home…so many options!

Just before the Labour Day long weekend, I was inspired by an article I read in a magazine about metallic finishes – zinc and hammered finishes are the next big trend. So, out I went to discover how to transform this piece into what I now pictured in my mind.

This is where I would usually get into the gory details of how I got from the “before” to the “after” pictures. But you may have guessed that this one is a bit different.

The broad strokes of this project were: find a wonderful, solid piece that has great potential, give it a good cleaning, lightly sand it, give it another good cleaning, measure, mark and drill holes for fancy vintage-inspired drawer pulls, paint first coat of awesome hammered finish paint, wait for it to dry, paint second coat, wait for it to dry, install fancy drawer pulls…and step back to admire!

As mentioned, this make-over project is different. Different because my home is full of wonderful gems already. And as much as I already love this piece, I’m more than willing to part with it.

That’s right…this is the first official piece of furniture to launch a new line from rouge!

”upcycle by rouge” is all about taking something old and giving it a new life. Not just re-using it, or recycling it, but making it better than it ever was before. Mixing old vintage and vintage-inspired pieces with modern elements to create truly one-of-a-kind originals that you simply will not ever see anywhere else.

upcycle by rouge items will only be available, well…when they are available. All based on our ability to find excellent pieces and work our magic to upcycle them while ensuring the highest possible standards.

That means you’ll have to keep checking out the blog for new items!

This great, solid wood dresser – that can be used in a bedroom, in a closet, in an entry way, in a bathroom, and even in your kitchen – provides excellent storage. It’s got a hammered aluminum metal finish and vintage glam drawer pulls. It measures 44 inches (height) x 29 inches (wide) x 18 inches (deep). Price = $295

All upcycle by rouge items also come with a “before” picture, so you can see & feel the history of the piece.

Contact us by phone, email or blog comment if you are interested in purchasing!

As always, thanks to our loyal and faithful readers for your continued support…you guys are also simply one-of-a-kind gems.

xx suzanne