Showing posts with label lamp makeover. Show all posts

Sunday, April 15, 2012

lamp makeover #3 (and draw prize!)

You may remember that a while ago, one of my lamp makeover projects was a  1980's light pink glass lamp. After I finished with it, it was a fun white lamp with a white linen lamp shade.


Well, after ruining the “world’s ugliest lamp” makeover project last week, which was meant to be the draw prize for those of you who joined rouge’s new facebook page, I found another one just like it!


So...I gave it a good cleaning, gently gave it a good going over with light sandpaper to remove any finish on the lamp, and cleaned it again.

Then, I covered the fixture part of the lamp as well as the cord with paper bags and tape.

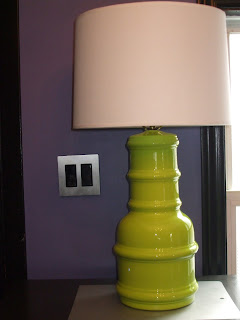
Finally, I gave it a couple of coats of glossy “true blue” paint to ensure a smooth and brilliant finish.


Add on a square-ish linen lamp shape and voila...a great looking lamp that will add a big pop of color to any decor.

And it’s one of a kind. Not perfect, but not like any other lamp in the world. Definitely unique.

Now... to give it away.

If you join us at www.facebook.com/rougesuzanne -- where you’ll find links to weekly blog posts and design ideas, tips, random thoughts and photos – before the END of the day tomorrow, you will be automatically be entered into a draw to win it!

Winner announced on the facebook page on Tuesday.


For more about rouge, visit www.littlered.ca or check out past blogs at www.justalittlerouge/blogspot.com

Sunday, July 24, 2011

lamp makeover #2

Here is my second lamp makeover. After the first (see Feb 20th blog) success, I’m become maybe a little bit obsessed with doing lamp makeovers.

I found this beauty-in-disguise at Value Village for $9.99 a few months ago. Luckily, I could see past the early 1980’s soft pink glass and gold combo and really appreciate it for its design, shape and size.

I knew I was going to have to put some furniture in my new addition, so I scooped it up and it’s been sitting in “the pile” in my living room, just waiting patiently for a little lovin’.

Finally, with just a few easy steps, it now looks fresh and modern and is a one-of-a-kind.

What you need:


1 can of Tremclad spray paint (gloss white) -- $10 (Canadian Tire)
1 new lamp shade -- $9.95 (Canadian Tire)
Small piece of sandpaper
Painters tape or masking tape

Here are the steps:

1. Clean thoroughly with damp cloth. Then clean it again!
2. Use painters tape to cover the metal bracket for the shade, the light socket and the electrical cord.
3. Lightly sand the entire glass base to remove some of the existing gloss finish. Wipe clean with damp cloth.
4. Carefully and slowly spray the ceramic base, starting at the top and working your way around and down to the bottom until entire lamp base is covered.
5. Wait to dry and spray on another coat. Repeat until you’ve got a good coat of a nice, even, full paint coverage.
6. Let dry overnight. Remove tape and attach new lamp shade.


Remember these handy tips:

Spray paint is hard to control and if you hit it with too much paint, you will get runs. Be patient and add paint in layers and you will get a wonderful glossy finish of rich color you are looking for!

And, please use spray paint in a well ventilated area. Preferably outside, but not when it’s windy. This stuff gets EVERYWHERE….I’d recommend using a mask as well, because it’s hard to do any type of spray paint project without breathing some of it in (yikes).

Again, I’m thrilled with the results of my second lamp makeover. Total cost of this project was $30…you just can’t buy new large, solid, lovely lamps for that price.


I’m 2 for 2 on the lamp makeovers…and I think I’ve run out of places for new lamps in my own place, but I know you might have a place for one.

Don’t be afraid…this is a really easy DIY project you can tackle for a small amout of money and a short amount of time that has big pay off.

Go ahead. Try it!


For more about rouge, visit www.littlered.ca or check out past blogs at www.justalittlerouge/blogspot.com

Sunday, February 20, 2011

lamp makeover

A while ago, I nabbed this lamp at the 50 mile Musquodoboit Valley yard sale (see 50 miles of possibilities, September 11, 2010). I’m pretty sure I paid $5 for it. I loved the size and the shape….it just needed a new lampshade. I wasn’t crazy about the stripes painted on it and would have preferred an all white lamp base. But there were options….

So this weekend, I decided to finally change it up and give it another whole new life. With just a few easy steps, it now looks fresh and modern.

What you need:
1 can of Tremclad spray paint (your choice of color) -- $10
1 new lamp shade -- $12.95
Small piece of sandpaper
Painters tape or masking tape

Here are the steps:
1. Use painters tape to cover the metal bracket for the shade, the light socket and the electrical cord. Tip: use paper lunch bags (or any other small bag to slip over the bracket, socket and cord. Tape them closed and you can be sure no paint will reach them.
2. Lightly sand the entire ceramic base to remove some of the existing gloss finish. Wipe clean with damp cloth.
3. Carefully and slowly spray the ceramic base, starting at the top and working your way around and down to the bottom until entire lamp base is covered.
4. Wait to dry and spray on another coat. Repeat until you’ve got a good coat of a nice, even, full paint coverage.
5. Let dry overnight. Remove tape and attach new lamp shade.


Two notes of caution….spray paint is hard to control and if you hit it with too much paint, you will get runs. Be patient and add to paint in layers and you will get a wonderful glossy finish of rich color you are looking for!

And, please use spray paint in a well ventilated area. Preferably outside, but not when it’s windy. This stuff gets EVERYWHERE….I’d recommend using a mask as well, because it’s hard to do any type of spray paint project without breathing some of it in (yikes).
Tip: WD40 is fantastic at removing paint from just about any surface that you might accidentally get paint on. Prepare for the wide range of overspray, but have some hefty paper towels and a can of WD40 on hand for speedy clean up immediately after you ’ve done spraying.

I’m thrilled with the results of my mini makeover. Total cost of this project was $28…and I just saw a similar ceramic lamp in one of the fancier décor stores. It was a bit smaller, but similar in shape and the exact same color…and it was priced at $240!

I like mine much better.


For more about rouge, visit www.littlered.ca or check out past blogs at www.justalittlerouge/blogspot.com