Showing posts with label furniture makeover. Show all posts

Sunday, February 26, 2012

coffee table makeover


Here is a simple makeover project I tackled this week.


Check out this gaudy black shellac kidney-shaped coffee table -- straight from the 1970’s, complete with gold trim.


I picked it up for $9.99 at Value Village. What a steal!  Even though it was beat up, I could see the potential.


Here are the steps to this makeover project:

1. thorough clean with a damp cloth, wipe dry

2. place on a large drop cloth, in a well ventilated area (outside is best)

3. sand down the bubbles in the table top until flush with the rest of the table top

4. clean again, with a damp cloth and wipe dry

5. paint with awesome flat black paint left over from another project. (Note: normally, I would recommend priming it first but I used Tremclad rust paint, which sticks to just about anything!)

6. Let dry. Paint second coat of black paint on table top and let dry.

7. Volia – you are done!


In the spirit of upcycling, I gave this old, beat up coffee table a whole new life. It looks fantastic in my living room. It's amazing to me what a good coat of black paint can do!


And, of course, you’d never find such a hefty, solid, interesting coffee table like this for 10 bucks!


For more about rouge, visit www.littlered.ca or check out past blogs at www.justalittlerouge/blogspot.com


Monday, September 20, 2010

upcycle by rouge

Hello just a little rouge readers! Here is some exciting news and another make-over project I wanted to share with you.

I picked up this awesome, solid wood dresser from a client a little while ago. I was drawn to the shape, size and the cool little retro details. I’ve been mulling over what to do with it since I got it home…so many options!

Just before the Labour Day long weekend, I was inspired by an article I read in a magazine about metallic finishes – zinc and hammered finishes are the next big trend. So, out I went to discover how to transform this piece into what I now pictured in my mind.

This is where I would usually get into the gory details of how I got from the “before” to the “after” pictures. But you may have guessed that this one is a bit different.

The broad strokes of this project were: find a wonderful, solid piece that has great potential, give it a good cleaning, lightly sand it, give it another good cleaning, measure, mark and drill holes for fancy vintage-inspired drawer pulls, paint first coat of awesome hammered finish paint, wait for it to dry, paint second coat, wait for it to dry, install fancy drawer pulls…and step back to admire!

As mentioned, this make-over project is different. Different because my home is full of wonderful gems already. And as much as I already love this piece, I’m more than willing to part with it.

That’s right…this is the first official piece of furniture to launch a new line from rouge!

”upcycle by rouge” is all about taking something old and giving it a new life. Not just re-using it, or recycling it, but making it better than it ever was before. Mixing old vintage and vintage-inspired pieces with modern elements to create truly one-of-a-kind originals that you simply will not ever see anywhere else.

upcycle by rouge items will only be available, well…when they are available. All based on our ability to find excellent pieces and work our magic to upcycle them while ensuring the highest possible standards.

That means you’ll have to keep checking out the blog for new items!

This great, solid wood dresser – that can be used in a bedroom, in a closet, in an entry way, in a bathroom, and even in your kitchen – provides excellent storage. It’s got a hammered aluminum metal finish and vintage glam drawer pulls. It measures 44 inches (height) x 29 inches (wide) x 18 inches (deep). Price = $295

All upcycle by rouge items also come with a “before” picture, so you can see & feel the history of the piece.

Contact us by phone, email or blog comment if you are interested in purchasing!

As always, thanks to our loyal and faithful readers for your continued support…you guys are also simply one-of-a-kind gems.

xx suzanne

Friday, November 6, 2009

picture frame makeover

Ever find yourself getting ready to go out the door, finally decide on that last minute accessory only to realize you can’t find it? Or that it’s in a big tangle with your other accessories? Or you can only find one of the earrings you’ve just got to wear??

Happens to me all the time. Actually, it USED to happen to me all the time. But not anymore, thanks to this little easy project.

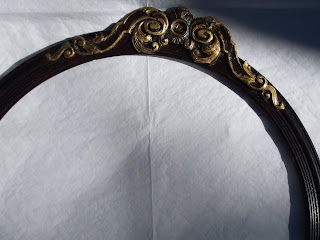
I bought an antique picture frame with no glass or backing that I liked because of its unique round shape (I did not like the fake gold gilding), and turned it into a great jewelry hanger/sorter/organizer. It was so easy…and I really like the added drama it gives to the space above the upcycled armoire in my walk-in closet.

Here are the steps to this makeover project:

1. thorough clean with a damp cloth, wipe dry
2. place on a large drop cloth, in a well ventilated area (outside is best)
3. spray paint one coat of high black gloss paint (let dry for 24 hours)
4. roll out screen (available at any home improvement store) and place frame on it
5. measure, mark and cut screen to match the shape of the inside of the screen (be sure to leave ½ inch extra on all sides
6. Use hot glue gun to affix screen to indie, back lip of the frame (let dry 2-3 hours)
7. Trim off access screen for a nice, clean finish on the back
8. Hang on wall, just like a regular picture frame
9. Poke earrings through the screen to hang together for safe keeping
10. Use ornament hooks to hold bracelets, necklaces and other accessories

Here is the budget breakdown of this project:
* antique picture frame (Antiques Plus) -$30
* paint – left over from past painting projects - $0
* screen – lots left over! (Canadian Tire) - $7
* ornament hooks (The Dollar Store) - $1

Be creative…you could do this with any type of frame, with any type of finish. Hang it in the bathroom, your bedroom, or in your closet. Even on the back of a door. Wherever works best for you!

Take this project and make it unique to you.

Enjoy,
xx rouge.